TETHON 3D
INTERNSHIP
Research & Design Intern
Omaha, Nebraska
SKILLS
Rapid Prototyping
Machine Engineering
SolidWorks Assembly
Design for Manufacture and Assembly
GD&T
Cost Analysis

CHALLENGE
Design, test, and iterate a new resin vat system that decreases the viscosity of the non-aqueous, clay resin to create stronger 3D-printer parts.

OVERVIEW
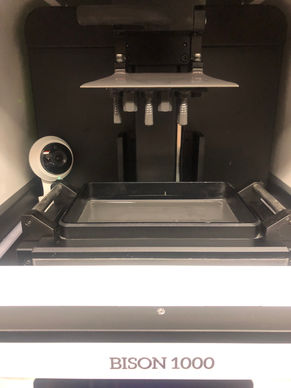
During my 2019 winter internship with Tethon 3D, a 3D printing startup, the CTO, the senior engineer, and I were tasked with creating a method to decrease viscosity in the clay-based SLA/DLP resin. In order to make higher quality 3D printed parts we had to use denser, more viscous resin. However, during the printing process, if the resin is too viscous, parts won’t print properly because the resin may not flow into the area under the build plate fast enough, or at all. Existing solutions included mechanical alterations that stir the resin but we chose the route of heating the resin after evaluating the viability of these methods. Because we were aiming at a 2019 Q3 launch date, we had immense pressure to create a functioning product. Working under deadline pressures, resource constraints, and real-world repercussions taught me how to operate effectively in an intense start-up environment. We had no room for mistakes; we needed to iterate quickly and effectively in order to push this product to market. These elements wove together to develop my designing ability and, ultimately, allowed me to gain valuable exposure to the entrepreneurial world.

MY CONTRIBUTIONS
Concept Generation
We began this exploration into heated resin by considering the various methods that would decrease the viscosity of our resin. The viscosity in the resin can be decreased by agitating the resin or heating up the resin. Prior to my arrival, the CTO had explored using a mechanical addition to the 3D printer to decrease viscosity, but after using other companies’ mechanical solutions, he decided against it. Instead, we decided that exploring various heating methods was the best course of action. We wanted to test our hypothesis that a heated translucent window would decrease the viscosity of the resin without compromising the print quality of these parts.

Window Prototyping
We prototyped the translucent window after we received a sample of the heated window from our supplier. In order to use this new prototyped window, we modified our existing resin vat to include the heated window. I designed a new resin vat with a slit for the heated window and a hole at the bottom of the vat for the wires so they could connect to a power source.

Heated Window Test
We connected our inkbird thermostat to control the temperature of the resin with our heated resin tray. This initial test gave us astounding results. The once viscous resin turned into a warm, watery resin that gave us the ability to test with higher quality resins. Despite this initial prototype’s success, we still needed to address the issue of thermal runaway in the glass. Because the inkbird thermostat is controlled by a simple switch, it could not keep a consistent temperature range; thus, it would affect the quality of the prints. In order to address this, I was tasked with creating an Arduino PID (proportional, integral, and derivative) controller that would keep the temperature of the heated window in a tighter temperature range, around 5 degrees Celsius.

Arduino Code Design
The PID Arduino code is designed to be a dynamic PID controller that uses PID variables to control the PID constants which in turn controls how aggressively the system would turn on and off. This code handles the input from an NTC thermistor in the resin vat and uses a N-type MOSFET to control the heat output into the heated window. Despite difficulties in debugging, the finished code enabled us to test our new, thicker resins with less variability in the resin heat.

Arduino Code Testing
Our test with the PID controller was even more astounding. We achieved 3D prints with the theoretical max for non-aqueous clay to solution ratio, 80%, that we couldn’t achieve with less-dense clay. We could not consistently reach our desired temperature, but we believe this can be alleviated with a different glass tray and more power for the system as a whole. The test overall confirmed our belief that heating resin would allow us to print denser clay resin which would help improve the quality of our prints.
Resin Vat Explorations
We also explored increasing the height of the capacity of the resin vat. This was important because complicated, intricate prints can use a significant amount of resin that may exceed the capacity of our current resin vat. We considered mechanical solutions however we knew that the corrosive nature of clay resin would damage any mechanical parts and it would risk contamination from one resin to another. With this, we decided that increased the height of the resin vat was our best option. After exploring this concept, we realized that we would need to add a window in front of the resin vat to allow longer prints to be removed from the printer. I designed a system that addressed these issues however in the end our designs were not further pursued for reasons outside of practicality of the design.

IMPACT & CONCLUSION
Although our investigations yielded more questions than answers, especially in terms of manufacturing and production, we confirmed our initial hypothesis: will using a heated glass window decrease the viscosity of our clay resin? I deeply enjoyed the entire process of helping this idea come to fruition. We started with a rough concept, made an MVP (minimum viable product), and tested our hypothesis. I practiced the engineering concepts I learned in school and I discovered the consequential challenges of the entrepreneurial world. After dealing with real-world hurdles in engineering products, I feel capable to take on challenging, more intricate projects that I was not comfortable with before this experience.
prev /


